Antibody Arrays Explained: A Guide to Multiplex Protein Profiling
Introduction
A microarray is an assay that allows the simultaneous detection of multiple molecules – such as nucleic acids, peptides, proteins, or antibodies – within a small surface area. For example, thousands of molecules can be analysed on a standard glass slide (75 mm × 25 mm). Microarrays provide researchers and clinicians with a broad snapshot of biological processes at a given time.
One common type of microarray for protein analysis is the antibody array. Compared to traditional “single-plex” assays, such as ELISAs that analyse one protein at a time, antibody arrays are more cost-effective, require minimal sample volume, and enable multiplex protein detection. This blog explores the different antibody array formats, how they work, and considerations for choosing the right format for your research.

How Antibody Arrays Work
Step 1: Immobilise Capture Antibodies onto Substrates
Capture antibodies are immobilised on solid substrates such as glass slides, membranes, or microbeads.
- Planar surface arrays: Capture antibodies with known specificities are spotted on a slide or nitrocellulose membrane in an addressable format.
- Bead-based arrays: Capture antibodies are bound to beads of varying sizes and fluorescent properties. Each bead’s characteristics indicate the target protein.
Step 2: Block the Array
Before sample incubation, the array is blocked to prevent non-specific binding. Protein-based blockers such as BSA or non-fat milk, often with a detergent (e.g., 1% Tween-20), reduce background noise and improve data accuracy.
Step 3: Add Samples and Detection Antibodies
During incubation, capture antibodies bind their target proteins. Unbound proteins are removed via washing.
- Label-based arrays: Proteins are pre-labelled with biotin before incubation.
- Sandwich-based arrays: Biotinylated detection antibodies are added after sample incubation, creating a “sandwich” with the target protein.
Alternative approaches, such as using a biotinylated lectin to detect glycosylated proteins, can also be employed.
Step 4: Detect Proteins via Chemiluminescence or Fluorescence
A streptavidin molecule conjugated to a fluorophore or horseradish peroxidase (HRP) binds to biotin. Detection is then achieved using:
- Chemiluminescence: HRP substrate produces light, measured via CCD camera, X-ray film, or gel documentation system.
- Fluorescence: Fluorophores are detected with laser scanners for glass slides or flow cytometry for bead-based arrays.


Qualitative, Semi-Quantitative & Quantitative Data
Antibody arrays can generate:
- Qualitative data: Visual inspection of signal intensity.
- Semi-quantitative data: Fluorescent or chemiluminescent outputs with relative expression differences (fold changes).
- Quantitative data: Data compared against a standard curve to determine exact protein concentrations.
Volume Requirements
Sample volume depends on the substrate, array design, and sample dilution:
- Sample dilution: At least 2-fold to minimise “sample matrix effects” (SMEs) that can block antibody binding.
- Protein concentration: For non-serum samples, aim for ≥1 mg/mL (ideally >2 mg/mL) for stronger signal.
- Sample handling: Membrane-based arrays require more sample than glass or bead arrays but are easy to handle and have low background noise.
Difference between Label-based and Sandwich Antibody Arrays
Label-based Arrays
- One antibody per protein (capture antibody).
- High-density arrays possible (up to 6,000 human proteins).
- Low sample volume required; semi-quantitative data.
- Best for biomarker discovery.
Sandwich-based Arrays
- Two antibodies per protein for higher specificity.
- Available on membrane, bead, and glass substrates.
- Provide semi-quantitative and quantitative data.
- Ideal for clinical trials and biomarker validation.
A Comparison of Label-based and Sandwich-based Antibody Arrays

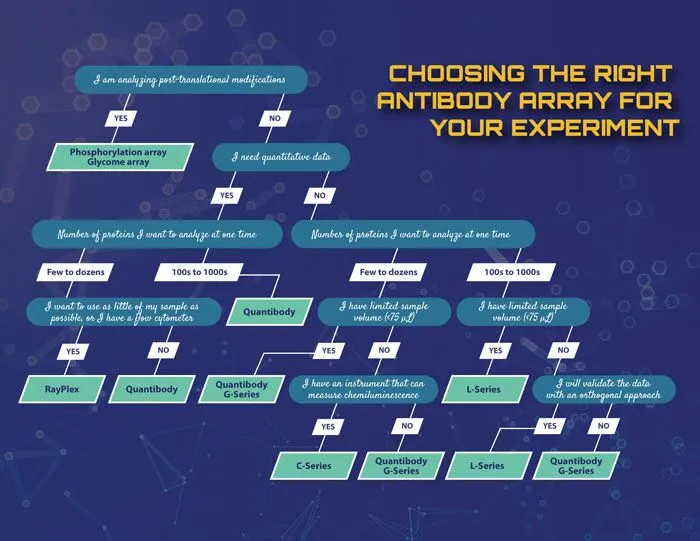
Decision tree to help choose the appropriate antibody array for the experiment.
Conclusion
Antibody arrays are a powerful tool for multiplex protein detection and profiling. High-density arrays are ideal for large-scale biomarker discovery, while smaller panels can focus on specific pathways such as inflammation, angiogenesis, or growth factors. Customisable panels and full testing services are available, making these arrays accessible even for laboratories with limited resources.