Category: Tips
Common Challenges in RNA Extraction and How to Solve Them
From Sample to Data: Cleaner RNA, Better Results
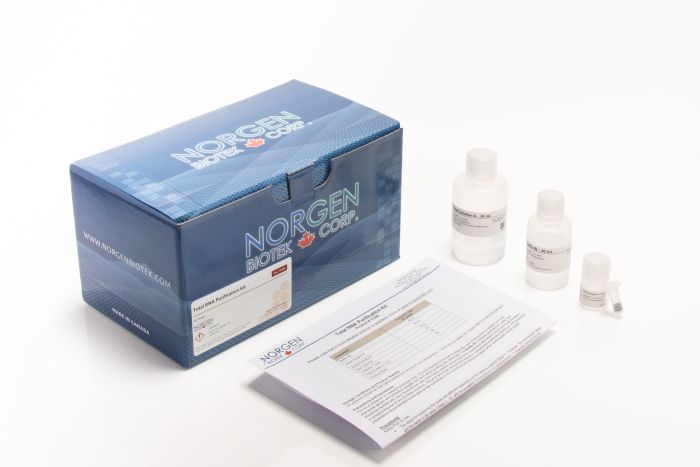
RNA extraction is a crucial step in molecular biology, but it often comes with obstacles that can impact downstream applications such as RT-qPCR, sequencing, and microRNA analysis. Researchers in Australia and New Zealand frequently face challenges with low yield, degraded RNA, or inhibitor contamination. Fortunately, Norgen Biotek’s Total RNA Purification Kits, distributed by Millennium Science, offer reliable and comprehensive solutions.
Challenge 1: Low RNA Yield
Working with small or precious samples often results in low RNA recovery.
Solution: Norgen’s Total RNA Purification Kits are optimised to maximise yield across a wide range of sample types, including blood, plasma, tissues, and cultured cells. With just one kit, researchers can extract total RNA covering all sizes from large mRNA down to small RNA species such as microRNA ensuring nothing important is lost.
Challenge 2: RNA Degradation
RNA is notoriously unstable and highly susceptible to degradation during purification.
Solution: Norgen’s patented silicon carbide (SiC) resin technology protects RNA integrity throughout the process. This unique chemistry binds and isolates all RNA species including fragile small RNAs without the need for harsh chemicals like phenol, chloroform, or alcohol precipitation. By operating under gentler conditions than traditional silica methods, the SiC resin preserves RNA integrity and delivers intact RNA ready for sensitive applications such as sequencing, RT-qPCR, and microRNA profiling.
Challenge 3: Presence of Inhibitors
Contaminants such as heme, salts, or proteins can inhibit enzymatic reactions and compromise results.
Solution: Norgen kits efficiently remove inhibitors during the purification process, providing RNA that is pure, stable, and immediately suitable for downstream workflows, from gene expression analysis to diagnostic assay development.
Take the uncertainty out of RNA extraction. Request a quote or contact Millennium Science today to learn more about Norgen Biotek’s complete range of RNA purification solutions.
Why Choose Norgen Biotek with Millennium Science
As the exclusive distributor of Norgen Biotek products in Australia and New Zealand, Millennium Science, based in Melbourne, provides researchers with responsive technical support, and competitive pricing. By combining innovative technology with local expertise, Millennium Science ensures scientists have the tools they need to achieve reproducible, high-quality results.
Unlocking the Power of Spatial Biology with the Right Antibody Choices
Secondary Antibody Selection for Spatial Biology
Spatial biology is transforming the way we understand biological systems. By integrating spatial information into research, it provides a holistic view of how cells and molecules interact within their native environment. This approach sheds light on the complex interplay between cellular and molecular components, offering deeper insights into the function and behaviour of living organisms.
To achieve reliable and reproducible results in spatial biology, careful antibody selection is essential. Here are some key considerations:
Consider Host and Target Species
Secondary antibody selection begins with species. The host of your secondary must differ from both the tissue species and the host of the primary antibody. For example, when using a rabbit primary antibody on human tissue, a goat anti-rabbit secondary is preferred. This reduces background interference and ensures the signal reflects true binding rather than cross-reactivity..
Match Secondary to Primary Class
Not all primary antibodies are the same. Polyclonal IgGs require anti-IgG secondaries, while monoclonal IgMs need anti-IgM secondaries. For monoclonal IgG subclasses (such as IgG1), it is best practice to use subclass-specific secondaries (anti-IgG1) for maximum accuracy. This level of matching safeguards against nonspecific binding and strengthens reproducibility.
Affinity-Purified: Cut the Noise
Affinity purification ensures secondaries recognise their targets with high specificity. By removing unwanted immunoglobulins, affinity-purified antibodies deliver clearer signals and consistent results – especially when detecting low-abundance proteins. The result: less noise, less background, and greater confidence in your data.
Cross-Adsorbed for Multiplexing
Spatial biology thrives on multiplexing, but multiple species and fluorophores introduce complexity. Cross-adsorbed antibodies are refined to remove cross-reactive components, lowering background and minimising false positives. This makes them ideal for multi-label experiments where precision is paramount.
Choose the Right Fluorophores
Signal clarity depends on the brightness and stability of your fluorophores. Rockland offers a wide range of conjugates, including DyLight™, Cy™, and FITC dyes. These high-performance labels are particularly powerful for detecting low-expression targets, ensuring that no signal is missed in complex tissue environments.
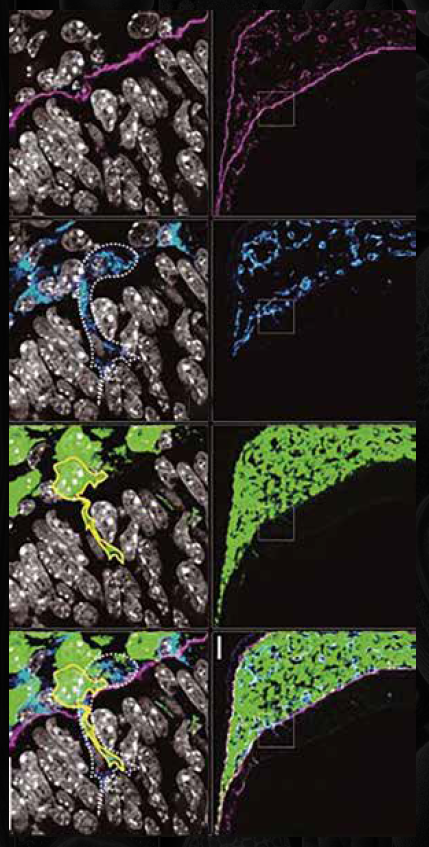
A Case in Point: Neural Crest Imaging
In one example, Rockland’s DyLight™ 649-conjugated goat anti-rat secondary antibodies were used to visualise neural crest-derived cells infiltrating the brain region of a mouse embryo. The result was a sharp, specific signal that allowed researchers to trace cell migration and interactions in detail. This illustrates the impact that well-chosen secondary antibodies can have on spatial imaging outcomes.
Conclusion
When it comes to spatial biology, success is in the details. Rockland’s secondary antibodies – affinity-purified, cross-adsorbed, and conjugated to high-performance fluorophores – provide the specificity and sensitivity needed for reproducible results.
Practical Tips for Reliable cDNA Synthesis in qPCR Workflows
Why cDNA synthesis quality matters for qPCR results
In any qPCR workflow, the quality of your cDNA is critical. Poor reverse transcription can lead to low sensitivity, biased results, and unreliable gene expression data. By following a few best practices and using a high-performance kit such as the SensiFAST™ cDNA Synthesis Kit from Meridian Bioscience (Bioline), together with Meridian’s RNA Isolation Kits, researchers in Australia and New Zealand can achieve consistent, reproducible results from sample to data.
Tip 1: Start with High-Quality RNA
The integrity of your RNA will directly impact your cDNA synthesis. Meridian’s RNA Isolation Kits provide high-yield, inhibitor-free RNA suitable for sensitive downstream applications. Whether you are working with blood, tissues, or cultured cells, these kits deliver clean RNA that sets the foundation for reliable cDNA synthesis.
Tip 2: Choose a Kit Designed for Full Coverage
Not all cDNA synthesis kits are created equal. Some introduce a 3′ bias, leaving long transcripts under-represented. The SensiFAST cDNA Synthesis Kit uses a combination of anchored oligo(dT) primers (which ensure the 3′ ends of mRNAs are always captured) and random hexamer primers (which prime across the whole transcript). This ensures a more accurate reflection of gene expression.
Tip 3: Optimise for Low Input Samples
When working with small or precious samples such as biopsies, sensitivity matters. The SensiFAST kit can generate high-quality cDNA from as little as 1 picogram of RNA, making it ideal for low-input applications. Pairing it with Meridian’s RNA Isolation Kits ensures even small amounts of RNA are recovered efficiently and protected from inhibitors.
Tip 4: Validate with a Trial Kit
For labs trialling Bioline solutions for the first time, trial kits are available. These smaller packs let you test both the RNA Isolation Kit and the SensiFAST cDNA Synthesis Kit in your own workflows before scaling up—helping you validate results with minimal upfront cost.
Why Choose Millennium Science
As the exclusive distributor of Meridian Bioscience Bioline products in Australia and New Zealand, Millennium Science provides:
- Local stock availability for faster delivery
- Expert technical support across RNA isolation and cDNA synthesis workflows
- Competitive pricing and access to trial kits for first-time users
From RNA isolation to first-strand synthesis, every step matters in your qPCR workflow. By combining Meridian’s RNA Isolation Kits with the SensiFAST cDNA Synthesis Kit, researchers can achieve reproducible, high-quality results, even with challenging or low-input samples.
Antibody Arrays Explained: A Guide to Multiplex Protein Profiling
Introduction
A microarray is an assay that allows the simultaneous detection of multiple molecules – such as nucleic acids, peptides, proteins, or antibodies – within a small surface area. For example, thousands of molecules can be analysed on a standard glass slide (75 mm × 25 mm). Microarrays provide researchers and clinicians with a broad snapshot of biological processes at a given time.
One common type of microarray for protein analysis is the antibody array. Compared to traditional “single-plex” assays, such as ELISAs that analyse one protein at a time, antibody arrays are more cost-effective, require minimal sample volume, and enable multiplex protein detection. This blog explores the different antibody array formats, how they work, and considerations for choosing the right format for your research.

How Antibody Arrays Work
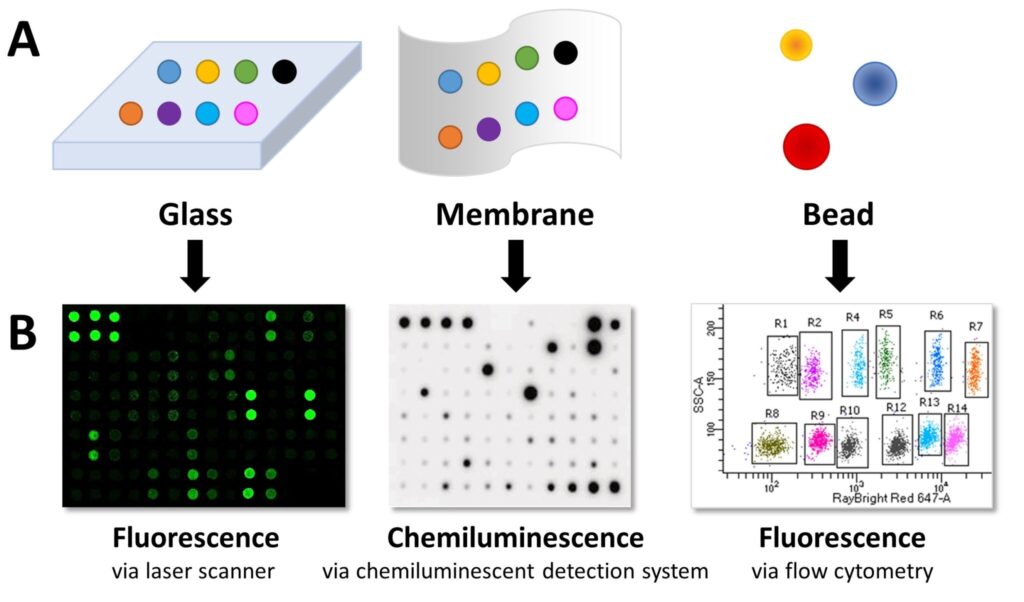
Step 1: Immobilise Capture Antibodies onto Substrates
Capture antibodies are immobilised on solid substrates such as glass slides, membranes, or microbeads.
- Planar surface arrays: Capture antibodies with known specificities are spotted on a slide or nitrocellulose membrane in an addressable format.
- Bead-based arrays: Capture antibodies are bound to beads of varying sizes and fluorescent properties. Each bead’s characteristics indicate the target protein.
Step 2: Block the Array
Before sample incubation, the array is blocked to prevent non-specific binding. Protein-based blockers such as BSA or non-fat milk, often with a detergent (e.g., 1% Tween-20), reduce background noise and improve data accuracy.
Step 3: Add Samples and Detection Antibodies
During incubation, capture antibodies bind their target proteins. Unbound proteins are removed via washing.
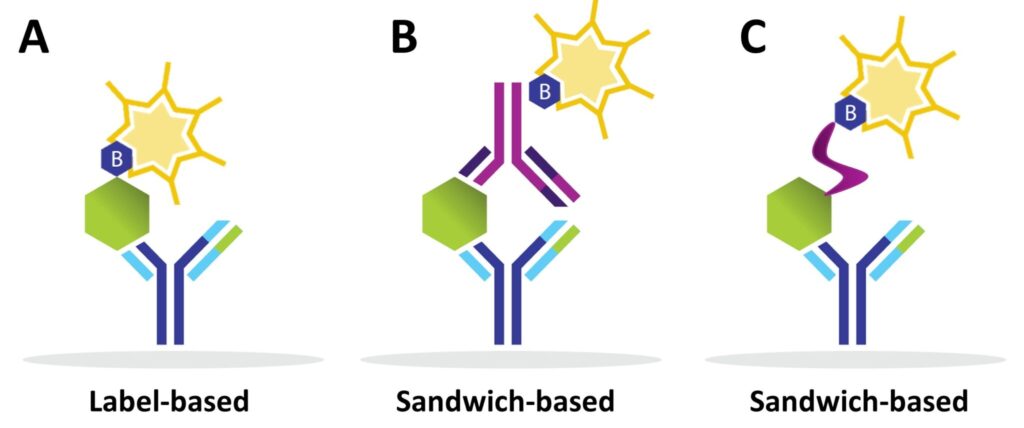
- Label-based arrays: Proteins are pre-labelled with biotin before incubation.
- Sandwich-based arrays: Biotinylated detection antibodies are added after sample incubation, creating a “sandwich” with the target protein.
Alternative approaches, such as using a biotinylated lectin to detect glycosylated proteins, can also be employed.
Step 4: Detect Proteins via Chemiluminescence or Fluorescence
A streptavidin molecule conjugated to a fluorophore or horseradish peroxidase (HRP) binds to biotin. Detection is then achieved using:
- Chemiluminescence: HRP substrate produces light, measured via CCD camera, X-ray film, or gel documentation system.
- Fluorescence: Fluorophores are detected with laser scanners for glass slides or flow cytometry for bead-based arrays.
Qualitative, Semi-Quantitative & Quantitative Data
Antibody arrays can generate:
- Qualitative data: Visual inspection of signal intensity.
- Semi-quantitative data: Fluorescent or chemiluminescent outputs with relative expression differences (fold changes).
- Quantitative data: Data compared against a standard curve to determine exact protein concentrations.
Volume Requirements
Sample volume depends on the substrate, array design, and sample dilution:
- Sample dilution: At least 2-fold to minimise “sample matrix effects” (SMEs) that can block antibody binding.
- Protein concentration: For non-serum samples, aim for ≥1 mg/mL (ideally >2 mg/mL) for stronger signal.
- Sample handling: Membrane-based arrays require more sample than glass or bead arrays but are easy to handle and have low background noise.
Difference between Label-based and Sandwich Antibody Arrays
Label-based Arrays
- One antibody per protein (capture antibody).
- High-density arrays possible (up to 6,000 human proteins).
- Low sample volume required; semi-quantitative data.
- Best for biomarker discovery.
Sandwich-based Arrays
- Two antibodies per protein for higher specificity.
- Available on membrane, bead, and glass substrates.
- Provide semi-quantitative and quantitative data.
- Ideal for clinical trials and biomarker validation.
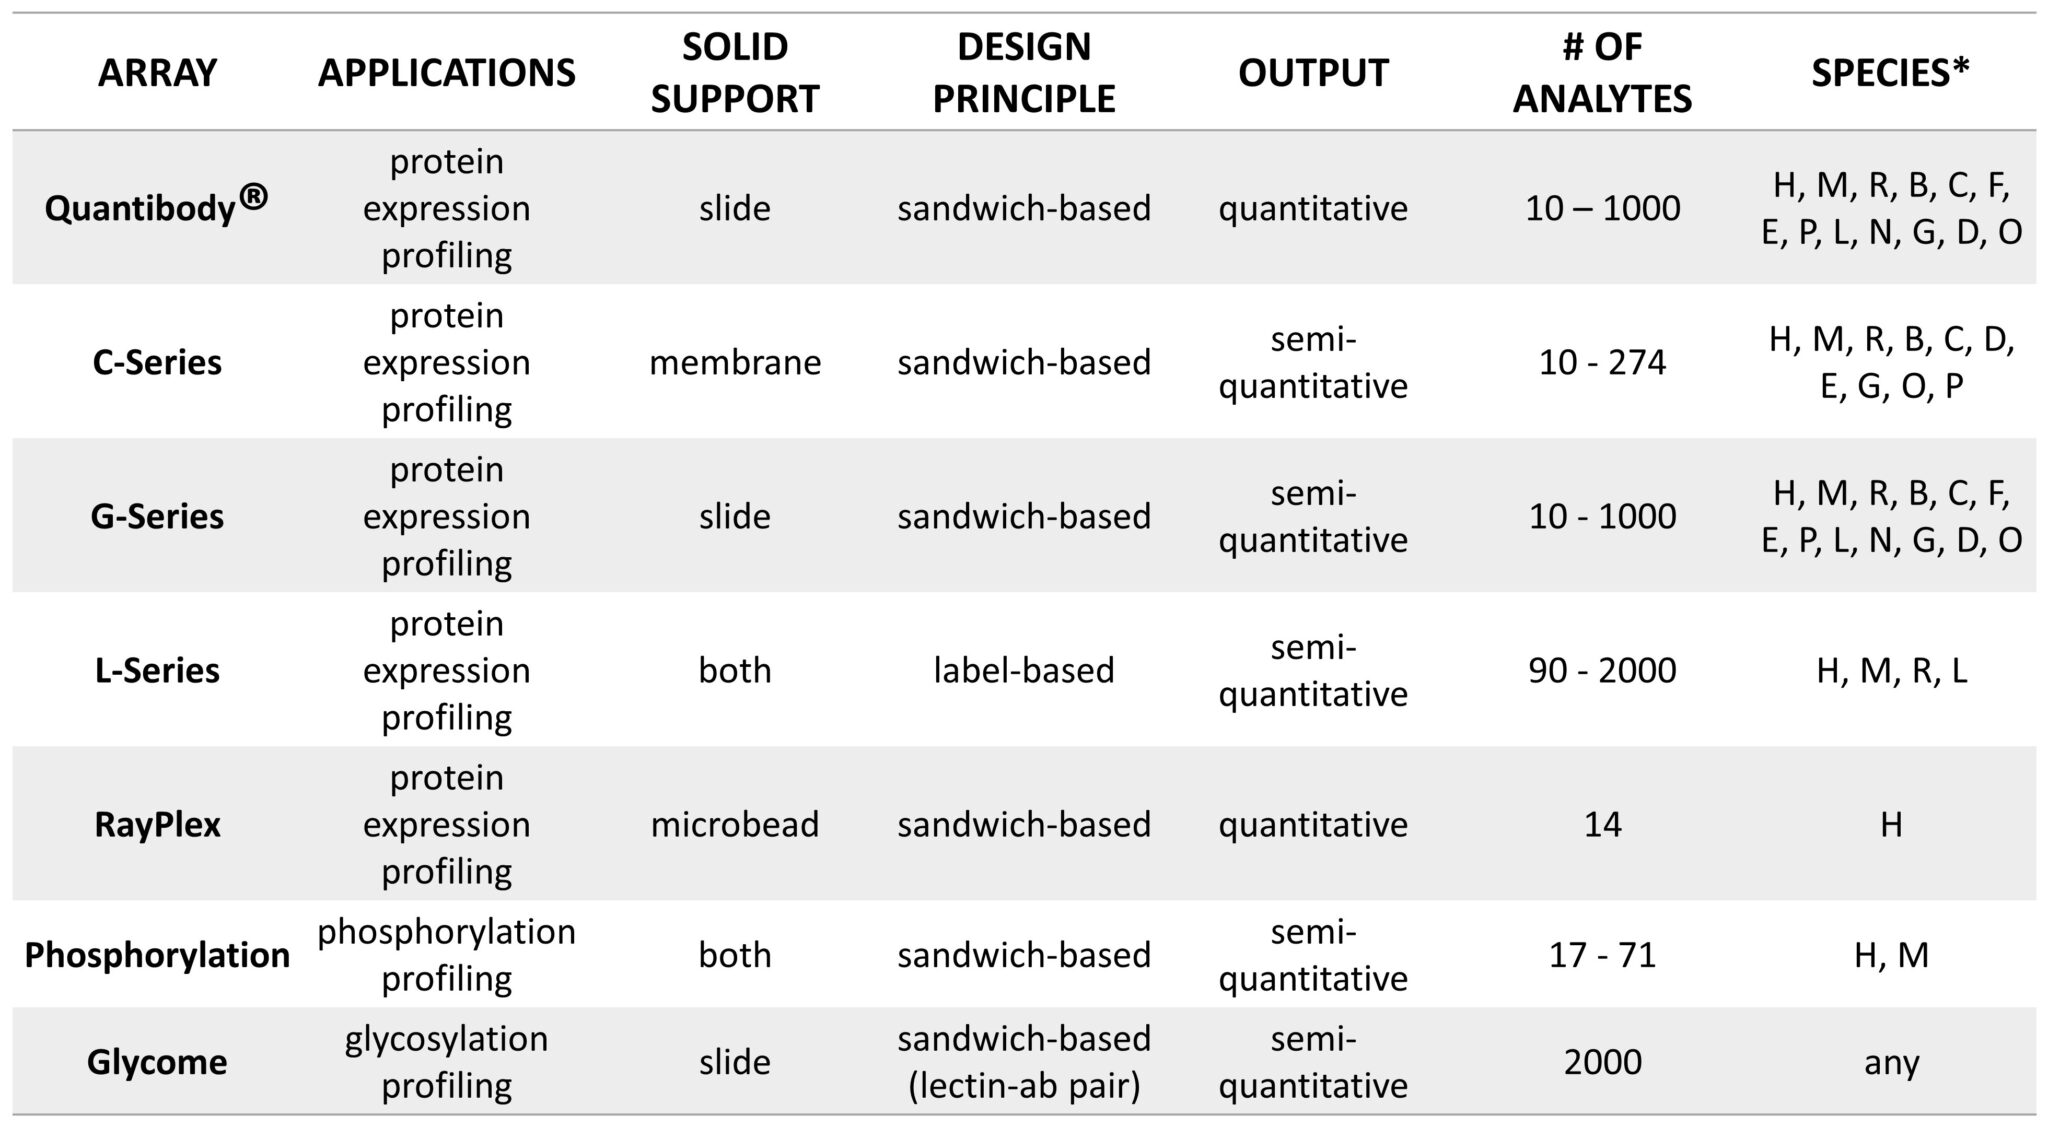
A Comparison of Label-based and Sandwich-based Antibody Arrays
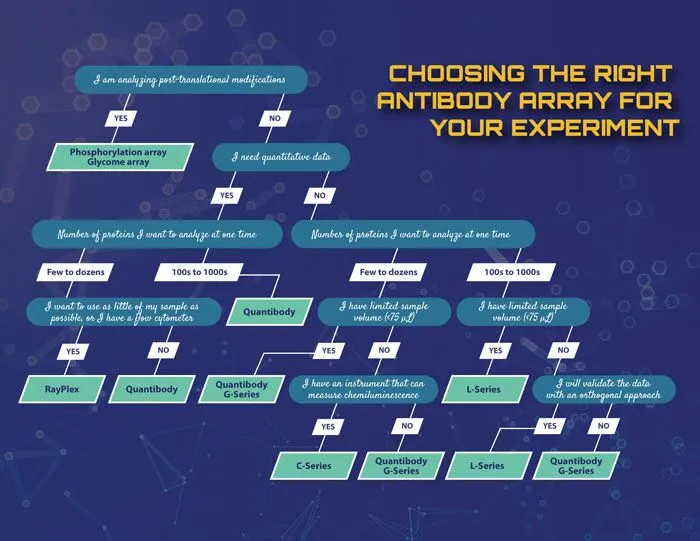
Decision tree to help choose the appropriate antibody array for the experiment.
Conclusion
Antibody arrays are a powerful tool for multiplex protein detection and profiling. High-density arrays are ideal for large-scale biomarker discovery, while smaller panels can focus on specific pathways such as inflammation, angiogenesis, or growth factors. Customisable panels and full testing services are available, making these arrays accessible even for laboratories with limited resources.
Unchained Labs instruments: grant writing resources and sole-source documents
How these instruments strengthen your funding proposal
When you’re writing a capital-equipment or method-development proposal, reviewers want to see clear capability gaps and why this specific tool is required. Below is a quick guide to Unchained Labs’ key instruments and why researchers across biologics, gene therapy and nanoparticle R&D include them in funding proposals. Request the vendor sole-source document for any instrument using the form at the bottom of this page.
Aunty: micro-volume, high-throughput biologics stability
Why include it in your proposal
- Measures Tm, Tagg and Tsize in a single 1-hour run by combining full-spectrum fluorescence with SLS and DLS (single instrument).
- 96-well sealed quartz plate, only 8 µL per well; ideal for large screens and long-term/isothermal studies.
- AAV/viral vector stability workflow tracks genome ejection, capsid disruption and aggregation.
- Unmatched speed: Aunty can measure size and fluorescene for a full 96-well plate of samples every minute.

Stunner: UV/Vis + (R)DLS in one platform
Why include it
- Only system to combine UV/Vis with rotating-angle DLS (RADLS) so you get concentration, size and polydispersity from the same 2 µL sample.
- For AAV, reports total capsid, full/empty ratio, size and aggregation in one workflow. For LNPs, quantifies payload by UV/Vis (Unmix) while measuring particle metrics by RADLS.
- 96 samples/run, automation-friendly microfluidic plates; wide absorbance range (0.03-275 OD10mm).

Lunatic: 96-well, 2 µL microvolume QC (DNA/RNA/protein)
Why include it
- 5 minutes for 96 samples (typical) and no drop-and-wipe – microfluidic plates handle sample loading and retention.
- UV/Vis plus Unmix applications to quantify targets and common impurities across a very wide linear range (no serial dilutions).
- Automation-friendly; GLP options available.
Leprechaun: single-particle LV & EV characterisation (SP-IRIS + fluorescence)
Why include it
- Combines SP-IRIS with fluorescence microscopy to measure concentration, size and protein composition at the single-particle level.
- LV assays quantify capsid and RNA-containing particles, empty capsids, aggregates, soluble p24, and EV contaminants from the same sample – minimal prep.
- Exosomes down to 35 nm, with phenotyping across up to 4 markers at once; 16 samples/run; 1-25 µL per sample.

Sunscreen: high-throughput nanoparticle formulation screening
Why include it
- Automates 96 unique formulations <6 hours with flexible TFR/FRR and optional inline dilution – walk-away runs cut time and material use.
- Uses reusable glass microfluidic “Sunnies” (40-200 nm applications) to improve reproducibility and reduce consumables.
- Designed to transfer methods directly to Sunshine for process development and continuous production.

Sunshine family: process development to continuous manufacture
Why include it
- Direct method transfer from Sunscreen to scale-up: Sunshine sits downstream of Sunscreen; the same pumping technology and microfluidic Sunnies are used across the Sunny Suite, so process parameters and learnings carry forward from screening into process optimisation and production.
- Built for optimisation and continuous operation: Sunshine is described as an automated process optimisation and continuous pumping system for moving to larger volumes, helping you justify end-to-end capability within one ecosystem.
- Lower implementation risk: Using the same Sunny Suite hardware and software stack across steps reduces re-validation effort when moving from hit-finding to robust production protocols.

Big Tuna: automated buffer exchange & concentration
Why include it
- Hands-off UF/DF you can trust: Big Tuna fully automates plate-based ultrafiltration/diafiltration to buffer-exchange, concentrate and clean up proteins, AAVs, LNPs and other biomolecules – cutting manual steps and setup time.
- High throughput, flexible formats: Run up to 96 samples (Unfilter 96) or 24 samples (Unfilter 24) in one experiment; the plates are designed for pressure-driven UF/DF, supporting efficient, parallel prep.
- Tight process control for reproducibility: Gentle mixing and positive pressure deliver uniform exchange; the system monitors volumes and auto-adjusts cycles to hit your target % exchange and concentration – then can reconcentrate if needed.
- Great for formulation and characterisation workflows: Ideal upstream of stability or particle analyses; Unchained Labs shows streamlined formulation screens and sample prep when pairing Big Tuna with other tools in the portfolio.

Request Sole Source document
On this page
- How these instruments strengthen your funding proposal
- Aunty: micro-volume, high-throughput biologics stability
- Stunner: UV/Vis + (R)DLS in one platform
- Lunatic: 96-well, 2 µL microvolume QC (DNA/RNA/protein)
- Leprechaun: single-particle LV & EV characterisation (SP-IRIS + fluorescence)
- Sunscreen: high-throughput nanoparticle formulation screening
- Sunshine family: process development to continuous manufacture
- Big Tuna: automated buffer exchange & concentration
- Request Sole Source document
How to Choose the Best ELISA Kit
Introduction
Selecting the best ELISA kit for your research isn’t always straightforward. With so many options available, researchers need to ensure their chosen kit delivers reliable, reproducible, and biologically relevant results. The most critical factor? Antibody validation. Poorly validated antibodies can compromise sensitivity, specificity, and reproducibility – leading to wasted time and research funds.
Antibody Validation Matters
At the core of any ELISA are the antibody pairs it’s built from. Inconsistent or poorly characterised antibodies are one of the leading causes of failed assays and irreproducible results. In fact, antibody validation has been a major focus in the scientific community since 2016, when the International Working Group on Antibody Validation proposed five “pillars” for antibody validation in research【Nature Methods†】.
Many leading suppliers now adopt rigorous validation strategies. For example:
- Cloud-Clone applies CRISPR/Cas9 knock-out cell lines to confirm antibody specificity.
- Rockland contributed to shaping global guidelines on antibody validation.
Choosing ELISAs from suppliers that embrace these validation practices gives confidence in your results.
Sensitivity: Detecting the Right Target
Sensitivity is crucial for identifying native, correctly folded proteins in complex biological samples. Poor sensitivity often stems from antibodies raised against recombinant proteins or short synthetic peptides, which may lack proper folding or post-translational modifications.
Tip: If in doubt, check whether the ELISA has been cited in peer-reviewed publications detecting native targets.
Specificity: Reducing Cross-Reactivity
Specificity ensures antibodies bind only the target antigen. Problems like cross-reactivity (binding to similar but unintended proteins) or interference (other sample substances blocking antibody binding) can cause false positives.
Tip: Choose ELISAs validated for your sample type and tested with both positive and negative controls.
Reproducibility: Consistency Across Batches
Reliable results require reproducibility. Reputable manufacturers perform lot-to-lot validation, comparing new antibody lots against previous batches to maintain consistent performance.
Tip: Ask your supplier for the lot number validation report before ordering - this ensures both intra-assay and inter-assay precision.
Conclusion
When choosing the best ELISA kit, focus on antibody validation, sensitivity, specificity, and reproducibility. Selecting kits from suppliers committed to rigorous validation standards not only safeguards your data but also maximises research productivity.
At Millennium Science, we work with suppliers leading the way in antibody standardisation and ELISA validation. Whether you’re studying cytokines, growth factors, or disease biomarkers, we can help you find the right kit for your target.
👉 Contact us to explore validated ELISA kits for your research needs.
10 Tips To Prevent Cell Culture Contamination
Introduction
In this article, we share 10 essential cell culture contamination tips to help you safeguard your cultures and protect your work.
Mycoplasma contamination silently affects 15–35% of continuous cell cultures worldwide, undermining research reliability and wasting time and resources. Unlike other contaminants, mycoplasma is too small to detect under a microscope, can pass through standard filtration, and is resistant to many antibiotics. Preventing mycoplasma is critical for reproducibility and confidence in results.
1. Maintain Strict Aseptic Techniques
Good aseptic technique is your first defence. Consistent practices – such as hand hygiene, sterilising equipment, and minimising culture exposure – help reduce contamination risk.
2. Regular Mycoplasma Testing
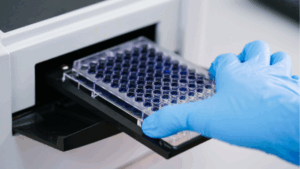
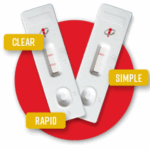
Routine testing is essential. Kits such as MycoStrip provide rapid and reliable detection of mycoplasma, ensuring issues are caught before they compromise experiments.
3. Quarantine New Cell Lines
Always isolate and test new cell lines before introducing them to your main laboratory environment. This step prevents cross-contamination and protects existing cultures.
4. Filter Sterilise Reagents
Use filtration with appropriately sized pores to eliminate potential contaminants in culture media and reagents.
5. Avoid Talking and Sneezing Near Cells
Surprisingly, 80% of lab staff carry mycoplasma. Talking or sneezing over cells can spread contamination, so keep lids closed and conversations outside the hood.

6. Retire Mouth Pipetting (It’s So 1970s!)
Mouth pipetting can introduce mycoplasma species such as M. orale. Always use proper pipettes – your cells (and lab safety officer) will thank you.
7. Maintain Clean Workspaces
Regular cleaning of biosafety cabinets, incubators, and other workspaces prevents contamination from building up in the lab environment.
8. Ensure Proper Training for Personnel
Well-trained staff are less likely to make mistakes that lead to contamination. Invest in training for all team members handling cultures.
9. Consider Preventative Antibiotics
Preventative antibiotic cocktails, such as those from InvivoGen, provide an additional safeguard when working with primary cells or cloning, where contamination risks are high.
10. Ask for Mycoplasma-Free Certification
Always request certification from suppliers confirming that cell lines are free from mycoplasma contamination before introducing them into your workflow.
Protect Your Research Integrity
By adopting strict aseptic practices, regular mycoplasma testing, and preventive measures, you can dramatically reduce the risk of contamination. Keeping your cultures clean ensures reliable results, saves time, and prevents costly experimental setbacks.
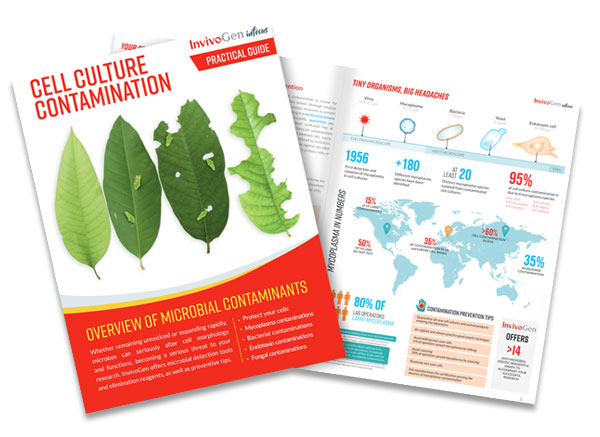
📘 Want to Learn More?
Download this Practical Guide to Understanding Cell Culture Contamination e-book for in-depth insights and strategies.
On this page
- Introduction
- 1. Maintain Strict Aseptic Techniques
- 2. Regular Mycoplasma Testing
- 3. Quarantine New Cell Lines
- 4. Filter Sterilise Reagents
- 5. Avoid Talking and Sneezing Near Cells
- 6. Retire Mouth Pipetting (It’s So 1970s!)
- 7. Maintain Clean Workspaces
- 8. Ensure Proper Training for Personnel
- 9. Consider Preventative Antibiotics
- 10. Ask for Mycoplasma-Free Certification
- Protect Your Research Integrity
- 📘 Want to Learn More?
10x Genomics Grant Application Resources
Grant Application Resources for Single Cell and Spatial Transcriptomics
Secure funding with confidence using our comprehensive 10x Genomics grant application resources, designed to help you articulate the scientific value, feasibility, and innovation of your single‑cell and spatial biology projects. Millennium Science partners with 10x Genomics to bring you expertly curated resources that strengthen your research proposals and increase your chances of success.
Why 10x Genomics?
10x Genomics technologies are widely used in peer‑reviewed research, enabling high‑resolution single‑cell and spatial profiling across diverse biological systems. With over a decade of innovation, extensive validation, and thousands of publications demonstrating impact, these platforms help you justify the scientific significance and methodological rigour of your proposals.
Downloadable Grant Resources
Enhance your applications with ready‑to‑use materials for key 10x Genomics platforms:


What’s Included in the Resources
Our downloadable guides provide:
- Clear technology descriptions that strengthen methodological justification
- Workflow and sample preparation overviews aligned with best practice
- Performance metrics and validation data to support feasibility claims
- Data processing and analysis recommendations
- Sample and project size considerations for budgeting
- Up‑to‑date references and supporting publications
Additional Support Materials
Inform your proposal with broader context and background:
Tailored Assistance from the 10x‑perts
Need help framing your aims or justifying your technology choice for upcoming grant application? Book a project discussion with one of our specialists. Our team can help with experimental design, sample requirements, technology selection and data analysis planning, providing valuable input for competitive funding applications.